- in Website , WordPress by Peter Nyiri
How To Migrate A Large WordPress Site With Zero Downtime

Migrating a large WordPress site can be a total nightmare. After you read this article, you will be able to do it easily, without downtime.
There are several plugins that can do this task. I tried many of them and my experience is that if your site is too big, the free ones are trouble.
Increase Media File Maximum Upload Size in WordPress
The first roadblock you may face is not being able to upload large files through your WordPress dashboard, therefore you won’t be able to upload your backup file.
By default, maximum upload size in WordPress ranges from 2MB to 150MB depending on the settings of your web hosting provider is giving by default.
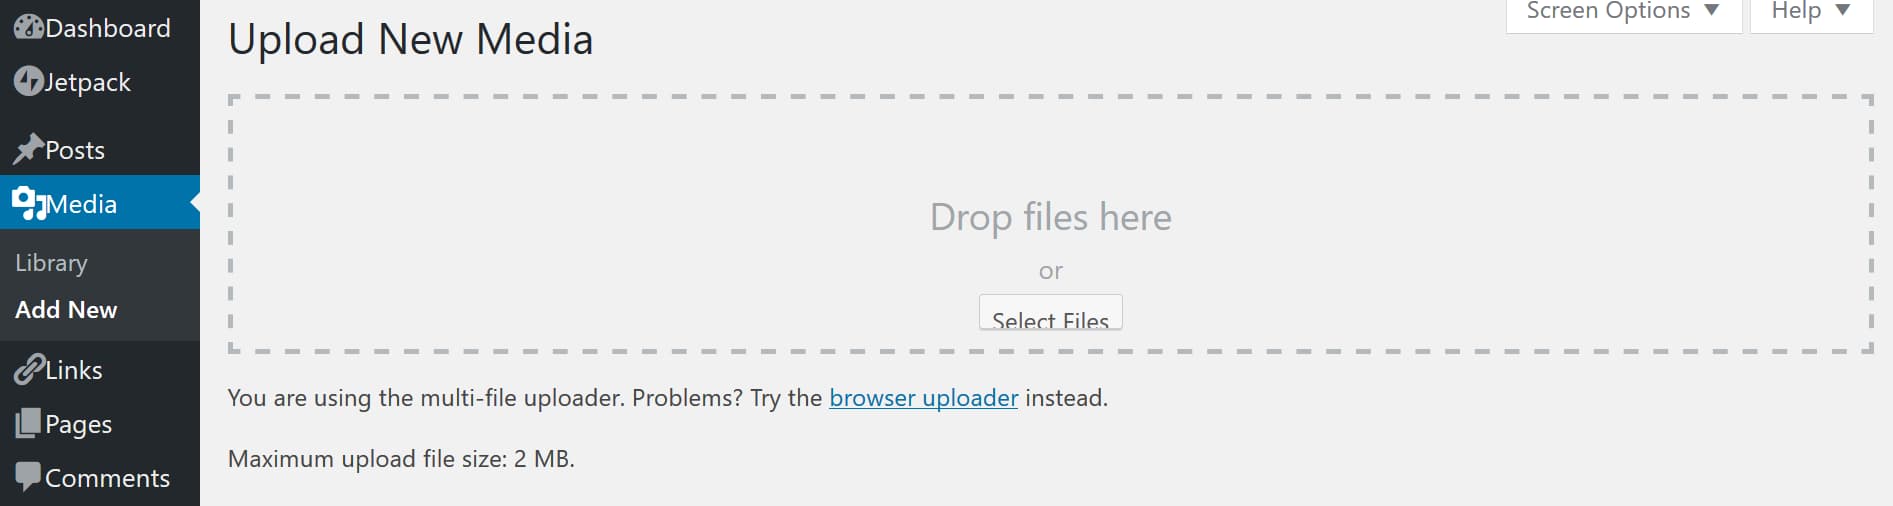
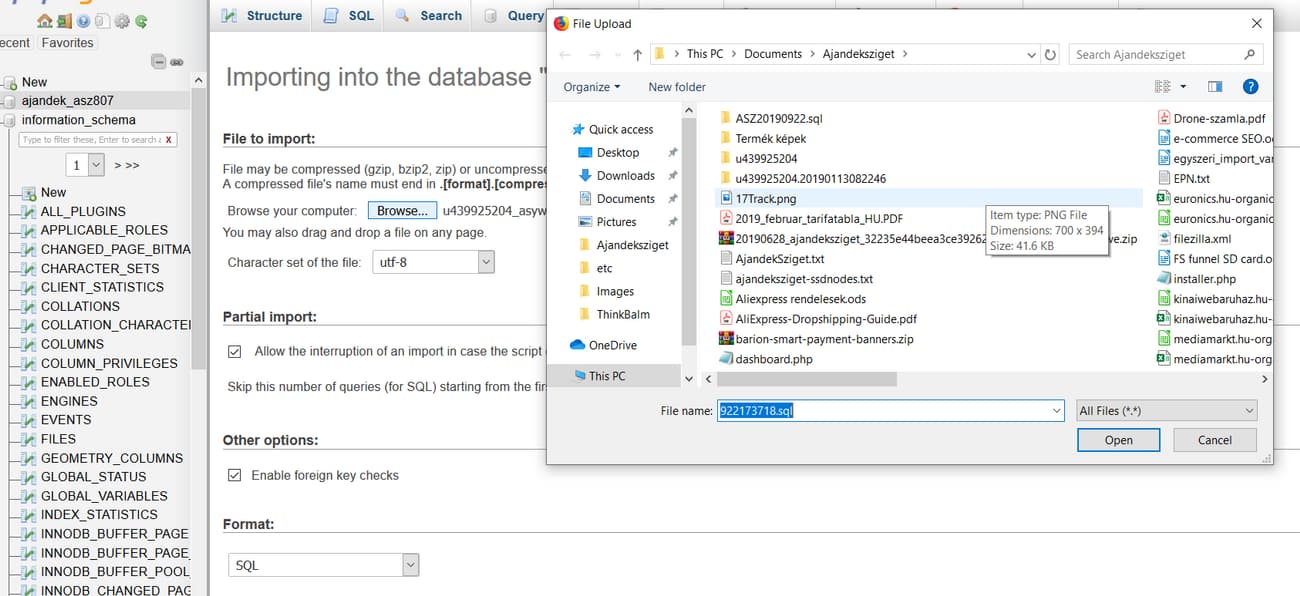
To check what is the current max upload size limit in your WordPress site then navigate to WP Admin → Media → Add New. You will see the current max upload size on the bottom as shown in the screenshot.
There are several recommended ways to increase the limit.
Creating A php.ini File
This is a default file used to configure any application which runs on PHP. This file contains parameters required for file timeout, upload size, and resource limits.
- Access your WordPress root directory using your host’s File Manager or FTP
- Navigate to the public_html>wp-admin directory
- Open any text editor and create a new file.
- Copy the following code and save it as php.ini.
post_max_size = 1028M
upload_max_filesize = 1000M
memory_limit = 256M
Apparently post max size needs to be bigger than upload max size.
If your control panel has a function to edit php.ini, use that. It’s more likely to work.

Editing wp-config.php File
Another way of increasing the upload size in WordPress is to define the size parameter in the wp-config.php file. To do that, access your WordPress root directory using SSH or FTP and locate a wp-config.php file.
Open the file in any text editor and add the following code.
@ini_set( ‘upload_max_size’ , ’20M’ );
@ini_set( ‘post_max_size’, ’13M’);
@ini_set( ‘memory_limit’, ’15M’ );
Contact Your Hosting Provider
If you do not want to edit the files yourself then you can always contact your hosting provider to do it for you.
If you are using certain hosts, then you may be able to increase the max upload size limits of your websites through the options in the platform. It is only a matter of a few clicks.
Update .htaccess file
If your web server is using Apache and PHP is set as an Apache module, then you can add a few lines of code in your WordPress .htaccess file to increase the max upload size in WordPress.
php_value upload_max_filesize 64M
php_value post_max_size 128M
php_value memory_limit 256M
php_value max_execution_time 300
php_value max_input_time 300
Exporting Your Site
As a first step, it is advised that in order to save space you clear any cache, delete any large zip backups that are inside the installation, etc.
There are several plugins that do this job. The main problem is that the plugin you are using may just just stop working during the scan process or during the export (after you waited an hour). This happens if your site is too big, some files are too large, file names have certain unusual characters, such as in foreign languages.
Therefore, if you have a large site and your host has a backup function, you may be better off creating a control panel and downloading it to your computer. A .tar.gz file is basically a zipped file that you can upload to your host straight (if your host’s file manager has an unzip function.)
Manual File Export
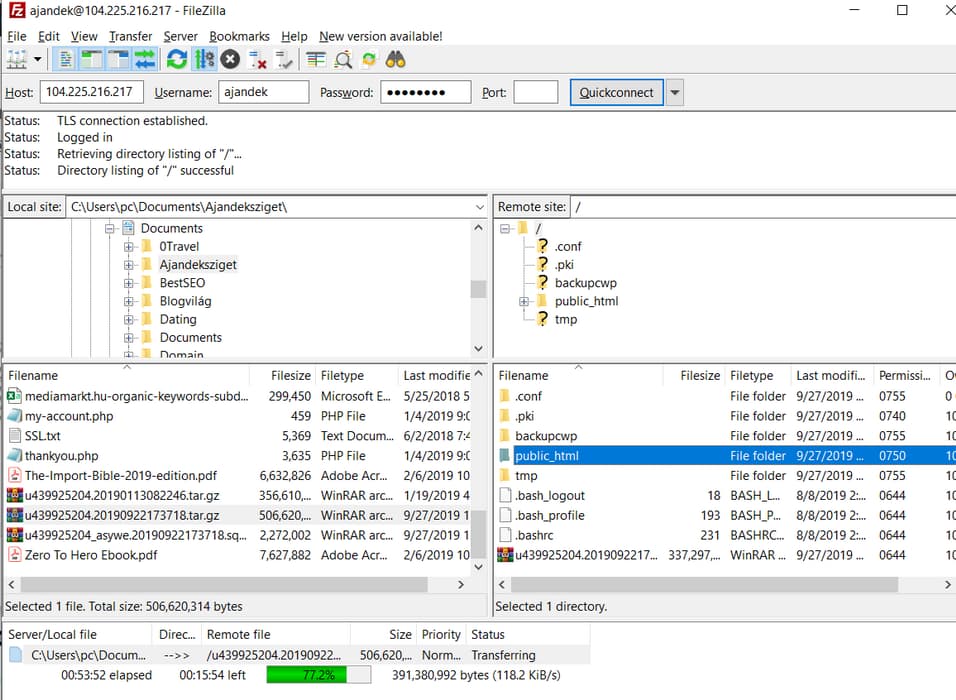
You can also just open your FTP, connect it to your site and download all the files unzipped.
An FTP program is similar to your Windows Explorer, the difference is that you can view your web server and your site’s files on the right and your local hard drive on the left and you can transfer files between the two. It is a slower process though than just moving files on your hard drive.
If you don’t have an FTP yet, I recommend FileZilla, which is a free FTP program.
There are a few folders where you site’s WordPress files could be on your server.
There could be a folder named yourdomain.com, and inside that there could be a folder called “public_html” or “htdocs”. Or there could be a “public_html” or similar folder in the root folder (main folder) of your account.
If you open that folder, your will see a few subfolders:
wp-admin: These are the files for your admin panel. You don’t need to save these.
wp-content: These are the files of your theme, plugins, etc. Go ahead and open it. Download the following folders to your hard drive:
- plugins
- themes
- uploads
Backing Up Your Database
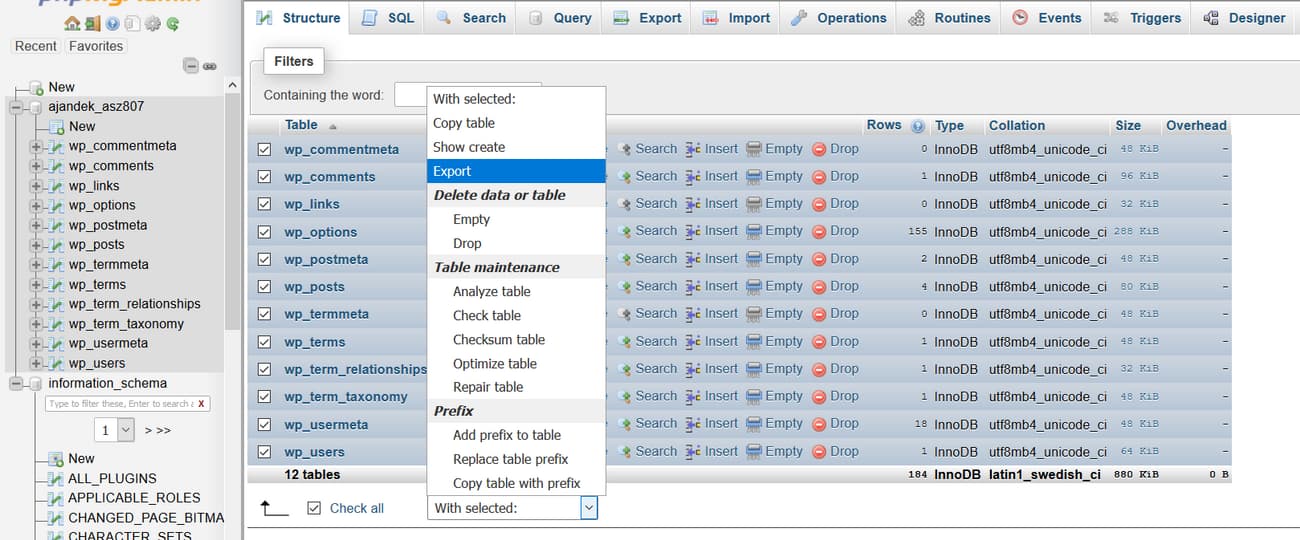
Go to your old host cPanel, find PhpMyAdmin under data bases. Open it and then open your database. At the bottom left area you will find a button “check all”. Then in the middle bottom there is a pull-down menu. First click “Optimize table”. This will help reduce the size of your database.
Warning: When importing, phpMyAdmin has a limit on import, I think it is around 80 MB. Big files will also time out. make sure you read the later section on imports.
Then click on “check all” again. Then click on “Export”. Select “quick” and “sql” format. Click “go”.
You will get a file like this saved on your hard drive:
b4_20294902_wpyexp.sql
This is your database. Its size is usually 20-30 MB.
Your host may also have an option to back up your database and download it with one click.
How To Avoid Downtime
The problem is that your domain needs to point to the new server. If you first change your name servers, your site will be down for the time of the upload.
First, the automatic SSL certificate generator isn’t going to work, for the same reason.
You can copy the SSL from your old host if it has such a function. If not, create an SSL certificate using SSLforFree. Then paste the certificate into the manual install. Later on you can replace it with your host’s AutoSSL.
To solve this, there is a trick to access the new website while domain not yet active through the IP address.
To do this, change your site’s URL and your WordPress URL in the WP-Options table of your database like this example shows:
https://xxx.yyy.zzz.xxxx/~username
https – IP address – a tilde ~ and then your user name:
Then you can log in and test your site.
https://xxx.yyy.zzz.xxxx/~username/wp-login
Setting Your Site Up On Your New Host
Now that you saved your website files, go to your new host cPanel.
Normally you need to create an account for your domain or add it as an add-on domain.
In the Softcalculus app installer click on WordPress. Go ahead and install WordPress on your domain.
Important:
- Make sure that the directory of your installation is the same as the previous installation’s directory name (or root directory if your earlier installation was in the root directory.) Check your FTP if needed.
- Set your admin user name and admin password the same it was in your earlier installation.
- Under “Advanced Options”, set your database “Table Prefix” and write it down, along with your database user name.
Then Click “Install”.
After the installation completed, log into the FTP of your new server.
Since your domain is not connected yet, you will have to use your site’s IP address as your Host instead of the domain-related hostname.
Navigate into the root folder belonging to your site (public_html, www or htdocs).
You should see something like this:
Navigate to wp-content, upload your “plugins”, “themes” and “uploads” folders.
It is faster to upload a compressed file, delete the existing installation’s files and then unzip.
(Warning: some control panels have no unzip function. You can upload and ask your server administrator to unzip in Linux, which only takes a minute.)
Both ways will take at least an hour.
Now go to your cPanel, open PhpMyAdmin, open the database that belongs to your new host.
Click on “Check all” to select all the database tables. In the “With selected” menu click on “Drop”. Confirm that you are trying to delete all tables in your database.
Now click on “Import” at the top and select the sql database you saved earlier. Press “Go”. It will take about a minute to import all the data.
Now you need to mage sure that the database name and password are correct in your new wp-config file, which is located in the public_html folder.
Database Too Big
If you have a large database, it will time out in the import process.
You will need to export and import the database in parts.
If you have server access, you can easily and quickly import databases:
- Upload the .sql database file to public_html
- # cd /home/user_dir_name/public_html/
- # mysql table_name < database.sql
Changing Your DNS
That’s it! Now you should change your domain name servers to point to your new host.
But before you do that, see if there are any DNS records that need to be moved – e. g. SPF, DKIM for email deliverability.
It will take up to 24 hours for the DNS to propagate. Don’t do any more updates to your site until this happens. It’s kind of difficult to tell, as your site on the new server should look exactly the same.
One way to tell I found was to check if your new FTP password is active on your domain.
The website speed could be different, too.
You can also use the command line “tracert yourdomain.com” from Windows 10 to see where your domain name resolves to.
I have experienced instances when the new domain name server was already working, then a few hours later my site wasn’t loading. I checked with customer service and the site was loading fine for them.
I figured out it wasn’t loading, because the old DNS came back. In this case,
- Right click on the Start menu.
- Select the Command Prompt.
- Run the following command: ipconfig /flushdns.
This will flush the DNS cache on your computer.
Make sure you set up your @yourdomain.com email addresses.
Verify that contact forms and SMTP plugins still function.
All-In-One Migration
All-in-One WP Migration is available in the WordPress repository. Just install the plugin as usual.
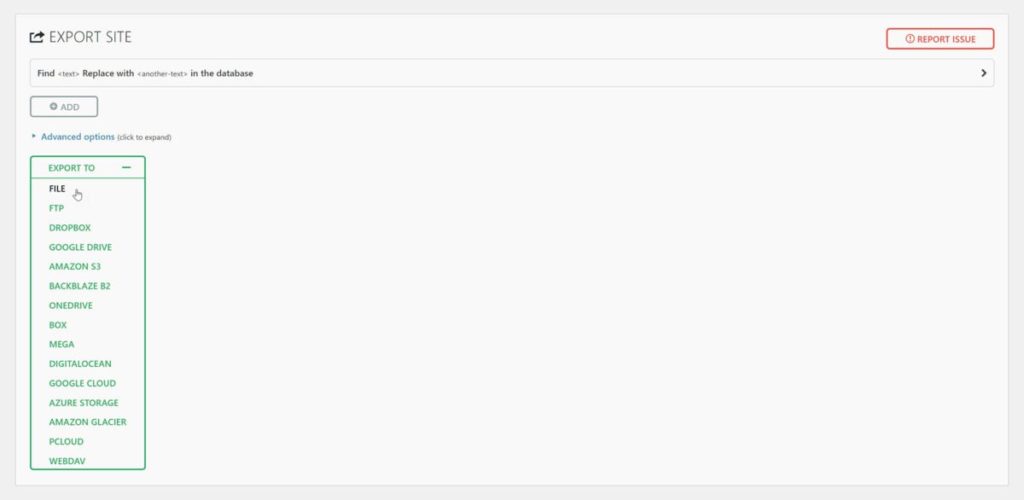
Then simply click on the All-in-One WP Migration link on the WordPress Dashboard menu. You will see a page with a large ‘Export To’ button at the bottom. It is in fact as simple as clicking on this button to proceed. Choose the Export to File option.
There are additional options, and there is a Find and Replace function at the top if needed, but most users can simply click Export To, and continue the process.
Download the file, it will have a .wpress extension.
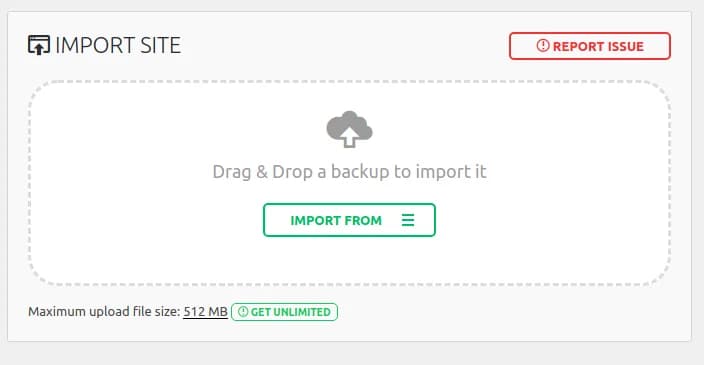
Importing your site to the new host is supposed to be simple. You just create a new WP installation on the target site, install the migration plugin and import.
Importing Your Site
However it has an import limit of 512MB.
Download the file, it will have a .wpress extension.
Importing your site to the new host is supposed to be simple. You just create a new WP installation on the target site, install the migration plugin and import.
Importing Your Site
However it has an import limit of 512MB.
You can install an older version of the plugin all-in-one-wp-migration.6.68. (The current versions wont support this method.)
If you want more upload size, follow the steps below.
- Go to plugins-> plugin editor-> select plugin to edit -> All in one wp migration
- Go to constants.php
- Go to line 303. (or) look for define( ‘AI1WM_MAX_FILE_SIZE’, 2 << 28 );
- Change 2<<28 to 2<<30 or any other number more than 30
- If the line is define( ‘AI1WM_MAX_FILE_SIZE’, 536870912 ), change it to define( ‘AI1WM_MAX_FILE_SIZE’, 536870912 * 2 ). This will increase from 512 MB to 1 GB (536870912 is just 512 MB in bytes).
This increases the max upload file size to 2GB
However there is no guarantee, I went through this process and sometimes it worked. Other times I spent an hour exporting, another hour exporting, and after I clicked OK to over write, the program stopped without even an error message and nothing was done.